


How To Photograph New York
A few years ago I visited New York and as you would expect, while I was there I took loads of photographs. Like many other people, in my mind I had a list of the sights that I wanted to see, and now having done it I decided I would share my top 10 tips on how to photograph New York if you are planning a vacation or break in NYC.
If you are planning to trip to New York, you may be wondering how to make the most of your journey to get the best photos. I certainly was before my trip so I have put together my top ten tips to help you photograph New York like a pro. So here are my top tips with all the essential information if you want to photograph the sights of the 'Big Apple' …
1. Plan ahead
The more research you can do before your vacation, the better. Before my trip, I bought a guide book for NYC which included a street map. There are lots choose from but I got the Rough Guide to New York City because it had a detachable map and the no nonsense style appealed to me. It’s actually really easy to find your way around because of the street grid system so start by marking on your map all of the locations you want to visit. Next, check out entry costs and opening times. Many places are completely free to visit or offer free entry on certain days of the week. More about the free stuff later.
Before you visit NYC, try to make a list so that you know where things are, when they open and how much they cost. With this information you can plan your own New York photo safari to include all the sights you don’t want to miss.
Be aware that some attractions will need to be booked ahead. This definitely applies to the ‘Top of the Rock’ the Rockefeller Centre – the views from the top are stunning but very popular so it’s best to decide what time you want to visit and buy your ticket earlier in the day.

The New York Manhattan skyline at night is definitely one to photograph but remember to plan ahead and buy your ticket in advance.
2. Know your camera (phone) and make sure you have everything you need
Try to become familiar with your camera before your trip, especially if you have bought a new camera or phone to use.As well as the camera itself, if you plan to take lots of NYC photos you may need some or all of the following:
- a protective case (consider one that’s waterproof or shower proof as well as protective),
- spare batteries or a battery charger. Be sure to take or buy a power adaptor if required,
- spare memory cards,
- a memory card case to protect the cards, and
- a selfie stick, if you really must 😉
Make sure that you start with a charged battery and at the end of every day get your phone or camera ready for the next day’s photo adventure. If you are using the camera on your phone things are a bit simpler but you will still need battery charge to take pictures.
3. Arrive early (or late) each day
One of the best times to photograph New York is early in the morning. Many attractions are busy by late morning so if you aren’t there early, you may have to spend time queuing to gain entry. We visited the 9/11 Memorial and Museum and we arrived just before 9.30am. There was no queue to get in and because there were very few visitors at that time of day it meant that we could reflect quietly as we viewed the exhibits.

Located next to the 9/11 Museum, the 9/11 Memorial Pools are beautiful. If you intend to visit the museum get there early and then photograph outside later on.
You will fit more sights in if you start early as well. You can pre-purchase tickets that include entry to multiple attractions but we found that we would need to visit about three a day to make them worthwhile compared to the individual attraction entry prices. They can often get you entry without the queue though. If you don’t like to spend too long at each attraction then these could be perfect for you, but if like me you prefer to take your time or you only want to visit one or two places each day then I would recommend buying the tickets at each venue. You can buy express tickets for places such as the Empire State Building but if you are visiting late at night (say 11pm) or out of season such as mid-January then they may not be necessary as the queues aren't likely to be too big at those times.
4. Use public transport
It’s easy to find your way around in Manhattan but the grid system of streets means that you need to cross the road every 75-100 yards and it can be time consuming waiting at the crossings, so one of the best ways to get around is by bus. We found public transport to be cheaper than in the UK and there are plentiful hop on-hop off bus tour services. There are a few services to choose from. We found that the Red Big Bus suited us the best for routes, times and frequency of buses.
A bus is a great places to photograph NY from and the hop on-hop off services usually include a tour guide or prerecorded information so you learn lots while seeing and photographing the sights of New York. The bus services, like the popular tourist spots themselves, can get busy at peak times of the day so it’s another good reason to travel early in the day and to plan your return time in case the last bus of the day has no seats available.
Boats can also provide a good way to photograph sights from a different viewpoint. There is a free ferry to Staten Island that offers a great view of the waterfront buildings and there are plenty of boat trips of varying distances that include a tour guide as well.
5. Have your camera or phone ready at all times
There’s nothing worse than seeing something and then having to spend time getting your camera out and by the time you have done that what you saw has gone. Make sure to keep your camera or phone ready all the time. Use a lens cap or protective camera bag if you have one to protect it and keep the camera around your neck or in your hand. If it’s too well tucked away you’re not likely to use it much. We found because the tourist areas of Manhattan are so busy, even at night, that we didn’t need to worry too much about camera security. Just be sensible about where you are and what’s going on around you.
6. Keep the camera still for night time and low light shots
(or use night photography mode on your phone)
The Manhattan skyline at night is magical but you need to keep your camera still to avoid ending up with a blurred image. One way to do this is find a viewpoint with a rail, ledge or wall where you can position your camera. Set the camera up on the wall or rail to include the view you want to photograph and use the self timer facility on the camera. Using the self timer means that the camera automatically takes a photo a few seconds after you have pressed the button so you don’t need to hold the camera while the photo is being taken. Doing this helps to reduce the camera shake that causes blurred images. Just remember to keep hold of the camera strap (without nudging or moving the camera) so that your camera doesn’t fall or get knocked off whatever you have placed it on! If you are using a phone that has a night photography mode (it will take multiple picturess and then combine them automatically) then this is a good time to use it.

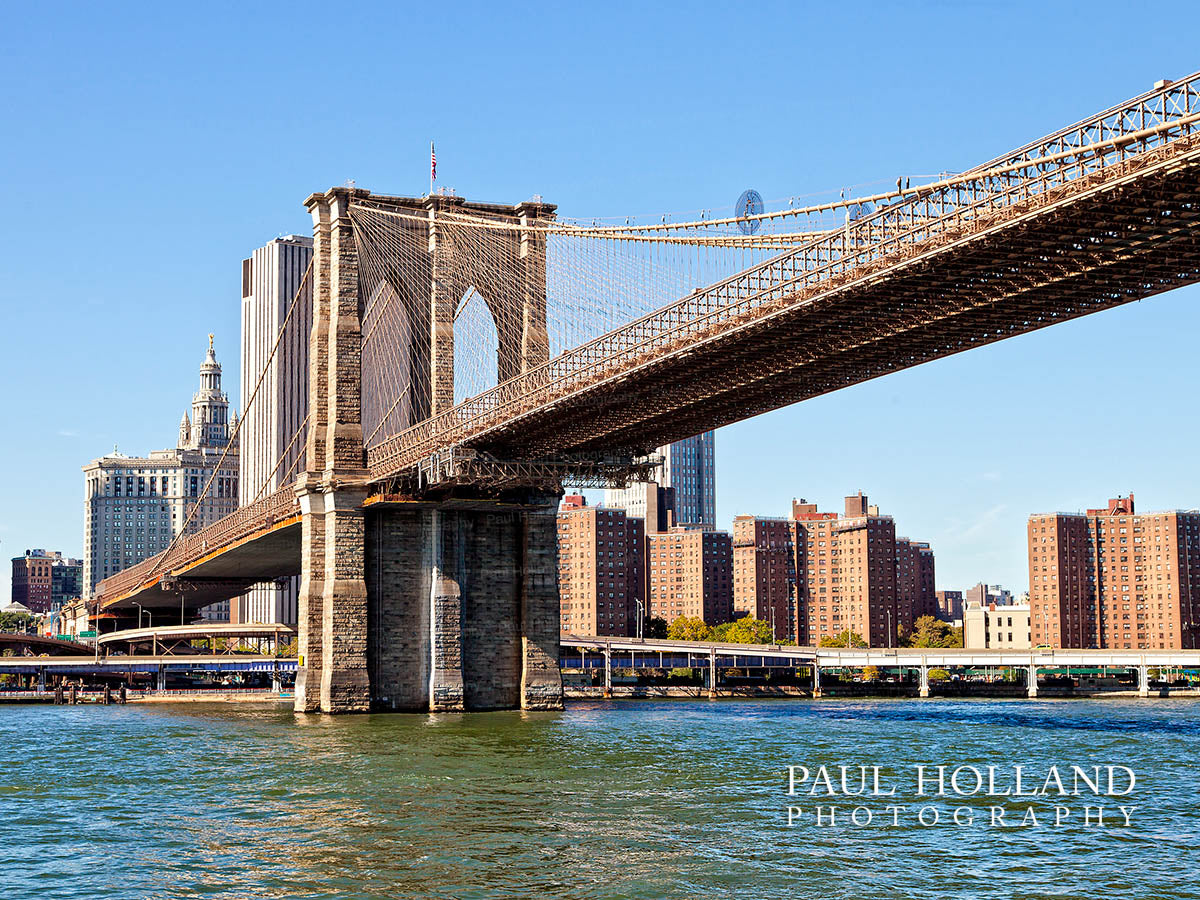
I took this image of downtown Manhattan at night from the Brooklyn Bridge
7. Photograph details

I love patterns and there are plenty of old buildings like this in New York
New York is not just about the big iconic attractions and sights. There are plenty of things you will find that just don’t exist back home and photographing the unique details helps to tell the story of your trip. Look out for things like fire hydrants, street signs, huge display screens in Times Square, fire trucks, police cars, building name plates, yellow cabs, traffic lights and modern art sculptures. There is plenty different about New York in the small details as well as the main attractions.
8. Look out for unusual angles
If you do travel by bus or boat you have a unique viewpoint compared to travelling on foot. Remember to look up too, there’s a lot to see above because of the shortage of real estate so take some photos. There are good views from the Top of the Rock (Rockefeller Centre) and from the Empire State Building. The High Line (a high level walkway using a converted railway line) also offers good views of city life from above. It doesn’t even need to be an attraction – we got a window seat on the top floor of McDonald’s in Times Square (not easy, but possible) which was great for photographing the crowds below. McDonald's has now closed it's Times Square restaurant and reopened a new branch a short distance away at 45th and Broadway.

I took this photograph while sitting on the top deck of a bus. Don’t stand up if you do this – the overhead street signs are very low!
9. Don’t limit yourself to the well known sights
I always like to look around and photograph something slightly different to the norm, so my recommendation here is to photograph the famous landmark and then start to look at what else interests you in the same vicinity. You can do the same if you are photographing from a bus or boat – just take photos of what interests you while you have the opportunity. You can always decide later whether you want to include it in your holiday photo album or slideshow.
10. Don’t forget there are lots of free attractions and sights to photograph in NYC
I have mentioned a few already but if you want to photograph New York City icons without breaking the bank, here’s a list of what I think are some of the best free sights and attractions in Manhattan:- Times Square – iconic and very busy. It’s never quiet and there’s always something to see, making it a good spot to photograph people.
- Staten Island ferry – the free ferry gives great views from which to photograph New York City.
- St. Patrick’s Cathedral – standing proud among the skyscrapers and department stores, St. Pat’s is magnificent both inside and out.
- Rockefeller Centre – an iconic New York site, the complex includes a skating rink and retail stores. Make sure you see the mural paintings on the walls and ceiling in the lobby area. Note that there is a charge to visit the top of the Rockefeller Centre.
- New York Public Library – NYPL is the largest public library system in the US and the main building is magnificent. The main reading room has wall murals and chandeliers but just about every area of the building is wonderful. Check out some of the smaller reading rooms as well.
- Grand Central Terminal – the star location of many movies, this is another must-see attraction. Stand at one end of the main terminal and take in the view – there will be people on the opposite side of the concourse doing the same!
- The High Line – this was formerly a disused a railway line that has been converted to offer a beautiful garden atmosphere with magnificent views of the city from above.
- Central Park – a quiet oasis where you can escape the noise and bustle of NYC. The park is larger than you might expect so if it’s on your list of places to see and photograph, make sure you allow plenty of time. You won’t see it all in less than a day but you there are various entry and exit points so you can choose a route to suit you. There is tranquillity to be found here as well as a zoo, boating lake, bridges, food outlets, walking, cycle and car routes, a museum, statues and sculptures.
There’s loads more free things to see in New York, these are just the ones I can personally recommend but there’s more information on the Internet. Just search for ‘free attractions in New York’.
If you get to make the trip to New York you won’t be disappointed and I hope the information above helps you get some great photos to remember it by. If you have any of your own recommendations for the best places in New York, let me know!